
Congratulations on Taking the First Step
to More Digital Visibility!
Then next step is to schedule a Strategy session...

Welcome to the world of Divi Theme Development, where creativity meets functionality. The Divi theme, developed by Elegant Themes, is renowned for its versatility and ease of use, making it a favorite among web designers and developers. Whether you’re a seasoned professional or a newcomer to the field, mastering Divi can significantly enhance your web design skills.
Divi’s drag-and-drop interface allows you to build stunning, responsive websites without touching a single line of code. This feature alone makes it an attractive option for those who want to focus on design and user experience. Moreover, Divi comes with a plethora of pre-made layouts and modules that can be customized to fit the unique needs of any business or project.
One of the standout features of Divi is its real-time visual editor, which lets you see your changes as you make them. This immediate feedback loop is invaluable for fine-tuning the aesthetics and functionality of your site. Additionally, Divi is SEO-friendly, ensuring that your site performs well in search engine rankings.
As you delve deeper into Divi Theme Development, you’ll discover a range of advanced features like global elements, split testing, and an integrated lead generation system. These tools empower you to create websites that are not only visually appealing but also optimized for performance and conversions.
Ready to take your web design skills to the next level? Get a quote at https://guru-is.com/#contact and start revolutionizing your web presence today!

Before diving into the intricacies of Divi Theme Development, it’s crucial to set up your working environment properly. A well-organized setup can save you time and help you make the most out of Divi’s powerful features.
First, ensure you have a reliable hosting provider that supports WordPress. While Divi is versatile, it performs best on a robust hosting environment that can handle its various functionalities. Many hosting providers offer one-click WordPress installations, simplifying the initial setup process.
Once your hosting is ready, the next step is to install WordPress. This typically involves downloading the WordPress package, uploading it to your server, and following the installation wizard. After WordPress is up and running, you’ll need to purchase and download the Divi theme from the Elegant Themes website.
To install the Divi theme, log in to your WordPress dashboard, navigate to Appearance > Themes, and click on Add New. Upload the Divi zip file and activate the theme. You’ll also need to enter your Elegant Themes API key to receive updates and access premium features.
With Divi installed, consider setting up essential plugins that complement its functionality. Plugins for SEO, security, and performance optimization can enhance your site’s overall effectiveness. Popular choices include Yoast SEO, Wordfence Security, and WP Rocket for caching.
Finally, familiarize yourself with the Divi Builder interface. Spend some time exploring its various modules, settings, and customization options to get a feel for how it works. This hands-on experience will be invaluable as you proceed with your Divi Theme Development journey.
To excel in Divi Theme Development, equipping yourself with the right tools is essential. These tools not only streamline your workflow but also enhance your ability to create stunning and functional websites with Divi.
First on the list is a robust *text editor* or *Integrated Development Environment (IDE)*. Tools like Sublime Text, Visual Studio Code, or Atom offer advanced features such as syntax highlighting, code snippets, and version control integration, making your coding process more efficient and error-free.
Next, a reliable *browser developer tool* is indispensable. Chrome DevTools or Firefox Developer Tools allow you to inspect elements, debug JavaScript, and fine-tune CSS directly within the browser. These tools are crucial for diagnosing and fixing layout or functionality issues in real-time.
Another essential tool is a *version control system* like Git. Version control allows you to track changes, collaborate with team members, and revert to previous states if something goes wrong. Platforms like GitHub or GitLab provide repositories where your code can be securely stored and shared.
For those looking to push their Divi designs to the next level, *graphic design tools* like Adobe Photoshop, Illustrator, or Sketch are invaluable. These tools help you create custom graphics, icons, and layouts that can be seamlessly integrated into your Divi projects.
Additionally, consider using *CSS preprocessors* like Sass or LESS. These tools enable you to write more efficient and organized CSS, incorporating variables, nested rules, and mixins to streamline your styling process.
Lastly, ensure you have a suite of *testing tools*. Services like BrowserStack or CrossBrowserTesting allow you to test your site across multiple browsers and devices, ensuring a consistent user experience.
By incorporating these essential tools into your development arsenal, you’ll be well-equipped to tackle any challenge that comes your way in Divi Theme Development.
Customizing Divi themes effectively can turn a generic template into a unique and engaging website that stands out. The Divi Theme, known for its flexibility and user-friendly interface, offers numerous ways to tailor your site to meet specific needs and preferences.
One of the most powerful tools in Divi is the *Visual Builder*. This drag-and-drop editor allows you to see changes in real-time, making it easier to experiment with different layouts, color schemes, and content arrangements. Use the Visual Builder to adjust the structure of your pages, add or remove sections, and customize modules to fit your design vision.
For more advanced customization, leverage the *Theme Customizer*. This built-in WordPress tool provides options for adjusting global settings such as typography, header and footer layouts, and color schemes. It’s an excellent way to maintain consistency across your website while giving you control over the finer details of your design.
Another effective method for customization is through *Custom CSS*. Divi allows you to add custom CSS directly within the Visual Builder or Theme Options panel. This feature enables you to fine-tune the appearance of your site beyond what is possible with the default settings. Whether you want to adjust spacing, alter hover effects, or implement media queries, custom CSS can help achieve these advanced design tweaks.
For those comfortable with code, creating a *child theme* is a best practice. A child theme allows you to make customizations without affecting the original theme files. This approach ensures that your changes won’t be lost when the theme is updated. With a child theme, you can add custom PHP functions, modify template files, and incorporate third-party scripts safely.
Finally, take advantage of Divi’s extensive *library of pre-made layouts and templates*. These resources can provide a solid foundation for your design, which you can then customize to suit your brand. By combining these ready-made layouts with your unique content and customizations, you can create a polished and professional website quickly and efficiently.
By utilizing these methods, you can effectively customize Divi themes to create a website that not only looks great but also performs well and meets your specific needs.

Optimizing performance in Divi is crucial to ensure your website loads quickly and provides a smooth user experience. A fast-loading website not only improves user satisfaction but also positively impacts your search engine rankings.
Start by *minimizing HTTP requests*. Each element on your page, such as images, scripts, and stylesheets, requires an HTTP request. By reducing the number of these elements, you can significantly improve load times. Utilize Divi’s built-in features to combine and minify CSS and JavaScript files, which reduces the number of requests and file sizes.
Another effective strategy is to *optimize your images*. Large, unoptimized images are one of the most common culprits of slow-loading websites. Use tools like TinyPNG or JPEGmini to compress your images without sacrificing quality. Additionally, consider implementing lazy loading, which defers the loading of images until they are needed, further speeding up your initial page load.
Enabling *caching* can also make a significant difference. Caching stores a static version of your site, allowing it to load faster for returning visitors. WordPress plugins like W3 Total Cache or WP Super Cache are excellent for setting up caching on your Divi site.
Take advantage of *Content Delivery Networks (CDNs)* to deliver your content more efficiently. CDNs distribute your site’s static files across multiple servers worldwide, ensuring that users load content from a server closest to their location. This reduces latency and speeds up load times for global visitors.
Another tip is to *manage your plugins* carefully. While plugins add valuable functionality, having too many or poorly coded plugins can slow down your site. Regularly review and deactivate any plugins that are not essential to your site’s operation. Ensure that all active plugins are up-to-date and well-maintained.
Finally, ensure your website is running on a *reliable hosting provider*. A good hosting provider offers optimized server configurations, faster response times, and better overall performance. Consider using managed WordPress hosting services that are specifically tailored to maximize the performance of WordPress sites, including those using Divi.
By implementing these optimization techniques, you can significantly enhance the performance of your Divi-powered website, leading to faster load times, improved user experience, and better search engine rankings.
Taking your Divi theme development to the next level involves mastering advanced techniques that can help you create more dynamic and customized websites. One of the most powerful tools at your disposal is *custom CSS and JavaScript*. While Divi offers many customization options out of the box, learning CSS and JavaScript allows you to go beyond and fine-tune every aspect of your design. You can add custom animations, create unique layouts, and improve user interactions.
Another essential technique is leveraging *Divi’s Hooks and Filters*. These are WordPress features that allow you to modify or extend Divi’s functionality without altering the core code. By using hooks and filters, you can add custom functionality to your site, such as dynamic content or specialized features, ensuring your site remains robust and up-to-date with Divi updates.
If you’re looking to create a more personalized experience for your users, consider implementing *conditional logic*. Conditional logic allows you to show or hide elements based on user actions or specific conditions. For example, you could create a form that changes its fields based on previous inputs, or display different content to users based on their location or device.
Another advanced technique is to *integrate third-party APIs*. APIs (Application Programming Interfaces) allow your Divi site to communicate with other software and services. This can be incredibly useful for retrieving external data, automating tasks, or adding complex functionalities like payment gateways or social media feeds. For example, integrating with Google Maps API can help you display interactive maps, while using a weather API can show real-time weather updates on your site.
Lastly, consider *optimizing your back-end processes*. Efficient back-end processes ensure that your site runs smoothly and can handle high traffic volumes. This includes optimizing your database, using advanced caching techniques, and ensuring your server configurations are tailored for performance. Tools like WP-Optimize can help you clean and optimize your database, while server-side caching solutions like Varnish can significantly reduce load times.
By mastering these advanced Divi development techniques, you can create highly customized, efficient, and user-friendly websites that stand out from the competition. Ready to take your Divi development to the next level? Get a quote at Guru-is.com and let’s build something amazing together!

In the digital age, where website performance can make or break a business, choosing the right type of IP address for your website hosting is more crucial than ever. A dedicated IP address offers numerous advantages over shared IP addresses, particularly in terms of reliability, security, and SEO benefits. Here's a comprehensive look at why opting for a dedicated IP address could be one of the best decisions for your website.
With a dedicated IP address, your website is the only one assigned to that specific IP. This exclusivity significantly reduces the risks associated with shared hosting environments. On a shared IP, if one website is blacklisted for spamming or malicious activities, it can impact all websites hosted under that IP. By having a dedicated IP, you isolate and shield your site from the consequences of others' actions.

Some advanced web hosting features, such as SSL/TLS certificates for HTTPS, often require a dedicated IP address to function properly. While it's possible to implement SSL/TLS on shared IPs through Server Name Indication (SNI), older browsers and systems might not support SNI, leading to accessibility issues. A dedicated IP ensures that all users, regardless of their system's capabilities, can securely access your site.

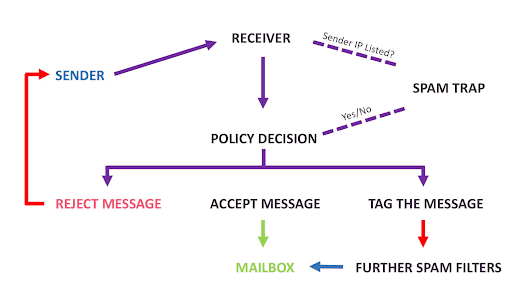
Email deliverability can be a concern for businesses using shared IP addresses. If another site on the same IP is sending spam, it could lead to the IP being blacklisted by email servers. This situation would adversely affect your email deliverability. A dedicated IP address isolates your email service from the activities of others, ensuring that your business communications are reliable and trusted.
A dedicated IP allows you to access your server directly via the IP address, which is incredibly useful for site testing and when domain names are in the process of being registered or transferred. Direct access ensures that you can maintain and update your site without any downtime associated with domain name issues.

Having a dedicated IP can indirectly benefit your website's search engine optimization (SEO). Although search engines like Google state that a dedicated IP address does not directly improve search rankings, the stability and security it provides contribute to the overall website performance. Better performance and reduced downtime correlate with a better user experience, a factor that is highly valued by search engines.
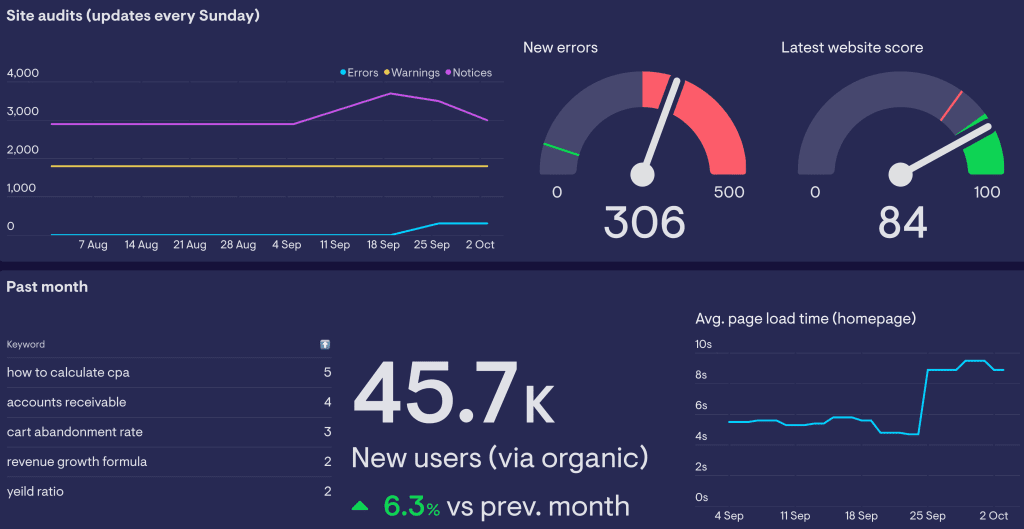
Websites on dedicated IPs can potentially experience faster performance speeds compared to those on shared IPs. Since you are not sharing resources such as bandwidth and processor power with other websites, your site can operate with optimal efficiency. This is particularly beneficial during traffic surges, as your site is less likely to go down or load slowly due to the activities of other sites on the same IP.
Finally, a dedicated IP gives you more control over your hosting environment. This is essential for websites with specific technical requirements or those that need to adhere to strict security protocols. You can implement custom server configurations and have greater flexibility in managing security settings without being affected by the needs or actions of other websites.
Investing in a dedicated IP address for your website hosting is a wise decision that can significantly enhance the security, reliability, performance, and SEO of your site. While it might come at a higher cost compared to shared IP options, the benefits of having a dedicated IP address far outweigh the expenses, particularly for businesses looking to grow and maintain a strong online presence. Consider switching to a dedicated IP to ensure that your website stands the best chance of succeeding in the competitive digital landscape.

WordPress has revolutionized the way we build websites, offering a versatile and powerful platform that caters to both beginners and experienced developers. Whether you’re creating a blog, an e-commerce site, or a corporate website, mastering WordPress can provide you with the tools and flexibility needed to design a site that truly represents your brand and engages your audience.
One of the key advantages of WordPress is its user-friendly interface. Even if you have no prior experience in web design, WordPress makes it easy to get started with its intuitive dashboard and extensive library of themes and plugins. Customization is at the heart of WordPress, allowing you to tailor every aspect of your site to meet your specific needs.
As you delve deeper into WordPress, you’ll discover an array of advanced features that can enhance your site’s functionality and performance. From SEO optimization to security enhancements, WordPress provides comprehensive solutions to ensure your website’s success.
Ready to take your website to the next level? Get a quote at https://guru-is.com/#contact.

Setting up your WordPress site correctly from the beginning is crucial to ensure a smooth and successful experience. Here are some essential tips to get you started on the right foot:
1. Choose the Right Hosting Provider: Your web host plays a significant role in your site’s performance and security. Opt for a hosting provider that specializes in WordPress, offering optimized servers, automatic updates, and robust security features.
2. Install a Reliable Theme: The theme you choose will define the look and feel of your website. Select a theme that is responsive, customizable, and regularly updated. Premium themes often come with additional support and features that can enhance your site’s functionality.
3. Essential Plugins: Plugins are the backbone of WordPress customization. Start with essential plugins such as Yoast SEO for optimizing your site’s search engine visibility, Akismet for spam protection, and WP Super Cache for improved site speed. Always ensure that your plugins are up-to-date to avoid security vulnerabilities.
4. Secure Your Site: Implementing strong security measures from the outset can protect your site from potential threats. Use a security plugin like Wordfence, enable two-factor authentication, and ensure you have regular backups in place.
5. Optimize for SEO: SEO is vital for driving organic traffic to your site. Configure your permalinks for better readability, use an SEO plugin to optimize your content, and submit your sitemap to search engines.
By following these essential setup tips, you’ll lay a solid foundation for your WordPress site, ensuring it is secure, fast, and optimized for search engines.
Optimizing your WordPress site for SEO is key to improving your search engine rankings and driving organic traffic. Here are some strategies to help you get started:
1. Use an SEO Plugin: Plugins like Yoast SEO or All in One SEO Pack can simplify the process of optimizing your content. These plugins offer features such as keyword analysis, meta tag management, and readability scores, helping you to create SEO-friendly posts and pages.
2. Optimize Your Content: Ensure your content is high-quality, relevant, and keyword-rich. Use your primary keywords in headings, subheadings, and throughout the text, but avoid keyword stuffing. Additionally, utilize internal linking to keep visitors on your site longer and to distribute page authority.
3. Improve Site Speed: A fast-loading site is not only crucial for user experience but also for SEO. Use caching plugins like WP Super Cache or W3 Total Cache to enhance loading times. Additionally, optimize your images by compressing them and using the correct file formats.
4. Mobile Optimization: With a significant amount of web traffic coming from mobile devices, having a mobile-optimized site is essential. Choose a responsive theme and use Google’s Mobile-Friendly Test to ensure your site performs well on all devices.
5. Implement Schema Markup: Adding schema markup to your site helps search engines understand your content better and can improve your visibility in search engine results pages (SERPs). Use plugins like Schema Pro to easily add structured data to your WordPress site.
6. Regularly Update Content: Search engines favor fresh content. Regularly update your articles with new information, and consider maintaining a blog to keep your site active. This practice not only improves SEO but also engages your audience.
By implementing these SEO optimization techniques, you can significantly enhance your WordPress site’s visibility and attract more organic traffic.

Enhancing the security of your WordPress site is crucial to protect it from hackers, malware, and other cyber threats. Below are some essential steps to bolster your website’s defenses:
1. Keep WordPress Updated: One of the simplest yet most effective security measures is to keep your WordPress core, themes, and plugins updated. Updates often include security patches that protect your site from vulnerabilities.
2. Use Strong Passwords: Ensure that all user accounts, especially admin accounts, use strong, unique passwords. Consider using a password manager to generate and store complex passwords securely. Additionally, implement two-factor authentication (2FA) for an added layer of security.
3. Install Security Plugins: Plugins like Wordfence, Sucuri, and iThemes Security offer comprehensive security features, including malware scanning, firewall protection, and brute force attack prevention. These plugins can significantly enhance your site’s security posture.
4. Limit Login Attempts: By default, WordPress allows unlimited login attempts, making it vulnerable to brute force attacks. Use plugins such as Login LockDown or WP Limit Login Attempts to restrict the number of login attempts and temporarily block IP addresses after a certain number of failed attempts.
5. Change Default Login URL: Changing the default login URL from ‘wp-admin’ or ‘wp-login.php’ can deter attackers who target these common endpoints. Use plugins like WPS Hide Login to easily modify your login URL.
6. Regular Backups: Regularly backing up your site ensures that you can quickly restore it in case of a security breach or other issues. Use plugins like UpdraftPlus or BackupBuddy to schedule automatic backups and store them in a secure location.
7. Secure Your Hosting Environment: Choose a reputable hosting provider that prioritizes security. Look for features such as SSL certificates, daily backups, and server-side security measures. Additionally, consider using a content delivery network (CDN) like Cloudflare to add an extra layer of protection.
By following these best practices, you can significantly reduce the risk of security breaches and ensure that your WordPress site remains safe and secure.

Customizing WordPress themes is a fantastic way to make your website unique and tailored to your brand’s requirements. Here are some strategies to help you get started:
1. Use the Customizer: WordPress comes with a built-in Customizer that allows you to make changes to your theme and see a live preview. You can adjust colors, fonts, and layout options, among other settings, without touching a single line of code.
2. Create a Child Theme: If you need more advanced customizations, consider creating a child theme. This approach allows you to add or modify CSS, templates, and functions without altering the parent theme. As a result, you can update the parent theme without losing your custom changes.
3. Utilize Page Builders: Plugins like Elementor, Beaver Builder, and WPBakery Page Builder offer drag-and-drop functionality, enabling you to create complex layouts easily. These tools are perfect for non-coders who want to design visually stunning pages.
4. Add Custom CSS: For those comfortable with CSS, adding custom styles can significantly enhance your theme’s appearance. You can do this directly within the Customizer under ‘Additional CSS’ or by using a plugin like Simple Custom CSS.
5. Modify Theme Files: If you have coding skills, you can directly edit your theme’s PHP files. This approach allows for advanced customizations, such as adding custom post types, modifying loops, or changing template structures. Always back up your files before making any changes.
6. Leverage Plugins: Numerous plugins are available to extend the functionality of your theme. Whether you need a slider, a contact form, or social media integration, there’s likely a plugin that can help. Ensure you choose well-maintained plugins to avoid compatibility issues.
7. Use Widgets: Widgets are a simple way to add content and features to your website’s sidebar, footer, or other widget-ready areas. Many themes come with custom widgets, and you can also add third-party widgets to enhance your site’s functionality.
By exploring these customization options, you can create a WordPress site that truly reflects your brand’s identity and meets your specific needs.

WordPress plugins are powerful tools that can extend the functionality of your website in countless ways. By leveraging plugins, you can add new features, enhance existing ones, and optimize your site for better performance and user experience. Here are some key considerations and strategies for effectively using WordPress plugins:
1. Choose Reliable Plugins: Always select plugins from reputable developers and check reviews and ratings before installation. Reliable plugins are regularly updated, well-supported, and compatible with the latest version of WordPress.
2. Prioritize Essential Plugins: While it’s tempting to install numerous plugins, it’s crucial to prioritize those that are essential for your site’s functionality. Overloading your site with unnecessary plugins can lead to performance issues and security vulnerabilities. Some must-have plugins include:
3. Test Plugin Compatibility: Before activating a new plugin, test it in a staging environment to ensure it doesn’t conflict with your current setup. This practice helps prevent potential issues that could disrupt your site’s functionality.
4. Keep Plugins Updated: Regularly update your plugins to benefit from the latest features, improvements, and security patches. Outdated plugins can become a security risk, making your site vulnerable to attacks.
5. Monitor Plugin Performance: Some plugins can slow down your site. Use tools like Query Monitor or P3 (Plugin Performance Profiler) to identify plugins that may be affecting your site’s performance and consider alternatives if necessary.
6. Customize with Add-ons: Many plugins offer add-ons or extensions that provide additional functionality. These can be particularly useful for tailoring plugins to meet your specific needs without installing multiple separate plugins.
7. Deactivate and Delete Unused Plugins: Remove any plugins you no longer use to keep your site clean and reduce potential security risks. Deactivated plugins can still pose a threat if they are not regularly updated.
By thoughtfully incorporating plugins, you can significantly enhance your WordPress site and provide a better experience for your users. Ready to take your WordPress site to the next level? Get a quote at https://guru-is.com/#contact and let our experts help you achieve absolute web success!

Introduction
In today's digital age, having a reliable online presence is crucial for business success. Managed hosting can be a game-changer for businesses looking to maximize their website's potential without the hassle of managing technical details. In this blog, we'll dive deep into what managed hosting involves and why it might be the right choice for your business.
What is Managed Hosting?
Managed hosting is a service where all technical aspects of running a website are handled by a hosting provider. This includes the management of hardware, software, security, and other critical services. It's an excellent option for businesses that do not have the in-house expertise or resources to manage server operations.

Key Features of Managed Hosting
Benefits of Managed Hosting
Choosing a Managed Hosting Provider
Selecting the right managed hosting provider is crucial. Consider factors such as uptime guarantees, support responsiveness, and the range of services provided. Guru Internet Services excels in providing top-notch managed hosting, ensuring high uptime and exceptional customer support. Be sure to thoroughly read through our customer reviews to gather comprehensive insights into the quality and reliability of our hosting services. This careful consideration will help ensure you make a well-informed decision with confidence.
Conclusion
Managed hosting can significantly ease the burden of managing IT infrastructure, allowing you to focus on what you do best—running your business. Whether you're launching a new site or scaling an existing one, managed hosting offers a blend of security, performance, and peace of mind.
For more information, you can check our Managed Hosting Services or contact our Support Team for personalized advice.

In the world of digital marketing, a call to action (CTA) is one of the most crucial elements. It serves as a guiding beacon that directs your audience towards the desired action, whether it’s making a purchase, signing up for a newsletter, or downloading an eBook. A well-crafted CTA can significantly boost your conversion rates and amplify the effectiveness of your marketing campaigns.
But what exactly makes a CTA effective? It’s more than just a button or a link; it’s a strategic tool that, when used correctly, can turn potential customers into loyal clients. A compelling CTA needs to be clear, concise, and action-oriented. It should create a sense of urgency and offer a tangible benefit to the user. The language used should be persuasive yet straightforward, making it easy for the user to understand what they are getting and why they should act now.
Moreover, the design of your CTA plays a vital role. Utilizing contrasting colors, eye-catching fonts, and strategic placement on your website or landing page can make a significant difference. Remember, the goal is to make it as easy as possible for your audience to take the next step.
At Guru-is.com, we specialize in crafting visually stunning and highly effective CTAs that drive real business success. Ready to transform your website? Get a quote today and see the difference!

The significance of a well-constructed call to action (CTA) cannot be overstated in the realm of digital marketing. CTAs act as the critical junction between visitor engagement and conversion, guiding users from passive browsing to taking decisive actions. Without effective CTAs, even the most beautifully designed website with compelling content can fall short in driving conversions.
One of the primary reasons CTAs are so essential is that they provide clear instructions to your audience. In a digital landscape saturated with information, users appreciate direct and straightforward guidance on what to do next. This clarity can reduce decision-making friction and lead to higher conversion rates.
Additionally, CTAs contribute to the overall user experience by creating a seamless path towards the desired action. They help maintain the flow of the user’s journey on your website, ensuring that visitors do not feel lost or overwhelmed. By strategically placing CTAs at key points within your content, you can keep users engaged and encourage them to move deeper into your sales funnel.
The impact of CTAs extends beyond mere clicks. They are valuable tools for gathering data and insights about user behavior. Analyzing the performance of different CTAs can offer valuable information about what resonates with your audience, allowing you to fine-tune your marketing strategies and improve future campaigns.
In essence, understanding the importance of CTAs is crucial for anyone looking to optimize their digital presence. A well-placed, thoughtfully designed CTA can mean the difference between a visitor who simply browses and one who becomes a loyal customer.

There are various types of effective calls to action (CTAs) that businesses can utilize to engage their audience and drive conversions. Each type serves a unique purpose and can be strategically employed based on the goals of your campaign and the behavior of your target audience.
1. Lead Generation CTAs: These are designed to capture potential customers’ information, such as email addresses, through forms or subscriptions. Examples include ‘Sign Up for Our Newsletter’ or ‘Download Our Free E-book.’
2. Social Sharing CTAs: These encourage visitors to share your content on social media platforms, thereby increasing your reach and visibility. Examples include ‘Share This Article’ or ‘Tweet This.’
3. Purchase CTAs: Direct and straightforward, these CTAs encourage immediate purchases. Examples include ‘Buy Now’ or ‘Add to Cart.’
4. Click-Through CTAs: These are designed to direct users to another page within your website, often a product page or a landing page. Examples include ‘Learn More’ or ‘Read More Details.’
5. Event Promotion CTAs: Used to drive registrations for webinars, workshops, or live events. Examples include ‘Register Now’ or ‘Join Our Webinar.’
6. Feedback or Survey CTAs: These are aimed at collecting user feedback or conducting surveys to gather insights. Examples include ‘Take Our Survey’ or ‘Give Us Your Feedback.’
7. Free Trial or Demo CTAs: These encourage users to try your product or service without any initial cost. Examples include ‘Start Your Free Trial’ or ‘Request a Demo.’
Understanding the different types of CTAs and when to use them can significantly enhance your marketing strategy. By matching the right CTA to your specific goals and audience behavior, you can create a more engaging and effective user experience.

Creating compelling CTA copy is an art that combines clarity, urgency, and relevance to motivate users to take action. Here are some essential tips to help you craft CTAs that convert:
1. Be Clear and Direct: Your CTA should leave no room for ambiguity. Use straightforward language that clearly states what you want the user to do. For instance, ‘Download Now’ or ‘Sign Up Today’ are clear and actionable.
2. Use Action-Oriented Verbs: Start your CTA with strong, commanding verbs that prompt immediate action. Words like ‘Get,’ ‘Download,’ ‘Start,’ and ‘Join’ can make your CTA more persuasive.
3. Create a Sense of Urgency: Incorporate words that convey urgency to encourage immediate action. Phrases like ‘Limited Time Offer,’ ‘Act Now,’ or ‘Only a Few Spots Left’ can drive users to act quickly.
4. Highlight Benefits: Clearly communicate the value or benefit the user will gain by clicking on the CTA. Instead of just ‘Sign Up,’ you could say ‘Sign Up to Get Exclusive Updates.’
5. Keep It Short and Sweet: Effective CTAs are typically short and to the point. Aim for a concise message that can be quickly understood and acted upon.
6. Personalize When Possible: Tailoring your CTA to the individual user can increase relevance and engagement. Using phrases like ‘Get Your Free Report’ or ‘Start Your Personalized Plan’ makes the action feel more customized.
7. Test and Optimize: A/B testing different versions of your CTA copy can provide insights into what works best for your audience. Regularly review performance metrics and tweak your copy to improve effectiveness.
By focusing on these key elements, you can craft compelling CTA copy that not only grabs attention but also drives action, ultimately leading to higher conversion rates and better business outcomes.
While the text in your call to action (CTA) is crucial, the design also plays a significant role in capturing attention and encouraging clicks. Here’s how you can design visually appealing CTAs that stand out:
1. Use Contrasting Colors: Choose colors that contrast with the rest of your webpage. This makes your CTA button pop and draws the user’s eye directly to it. For instance, if your website’s primary color is blue, a bright orange or yellow CTA button would be eye-catching.
2. Ensure Readability: The text on your CTA button should be easily readable. Use large, bold fonts and ensure there is enough contrast between the text color and the button color.
3. Make It Noticeable: Position your CTA in a place where it naturally draws attention. Common placements include above the fold, at the end of blog posts, or in the middle of content where it makes logical sense.
4. Add White Space: Surround your CTA with ample white space to make it stand out. Crowded designs can overwhelm users, making the CTA less noticeable.
5. Use Shapes and Icons: Incorporating shapes like arrows or icons can make your CTA more engaging. These elements can subtly guide the user’s eye towards the action you want them to take.
6. Keep It Consistent: While your CTA should stand out, it should also align with your brand’s overall design. Consistency in color schemes, fonts, and style helps maintain a cohesive look and feel.
7. Test Different Designs: Just like with CTA copy, A/B testing various design elements can help determine what resonates best with your audience. Experiment with different colors, sizes, and placements to optimize performance.
Effective CTA design balances aesthetics with functionality. By focusing on these design principles, you can create visually appealing CTAs that not only attract attention but also drive users to take the desired action.
Once you’ve crafted and designed your call to action (CTA), the next crucial step is to test and optimize it for maximum effectiveness. This process involves analyzing user interactions to identify what works best for your audience and making data-driven adjustments. Here’s how to get started:
1. A/B Testing: Conduct A/B tests by creating two or more versions of your CTA with variations in text, color, size, placement, or design. Measure which version performs better in terms of click-through rates (CTR) and conversions.
2. Analyze Click-Through Rates (CTR): Monitor the CTR of your CTAs to understand how many users are engaging with them. A low CTR might indicate that the CTA is not compelling enough or not noticeable.
3. Use Heatmaps: Heatmap tools can provide visual data on where users are clicking on your webpage. This information helps you understand if your CTA is placed in an optimal location or if it needs repositioning.
4. Experiment with Copy: Test different wording in your CTAs to see what resonates most with your audience. Sometimes a simple tweak in the phrasing can significantly impact performance.
5. Optimize for Mobile: Ensure your CTAs are mobile-friendly. Test how they appear and function on various devices to provide a seamless user experience across all platforms.
6. Track Conversion Rates: Beyond clicks, measure the actual conversions resulting from your CTAs. This helps you assess the overall effectiveness and return on investment (ROI) of your CTA strategy.
7. Iterate Based on Data: Use the insights gathered from your testing to make informed adjustments. Continuous iteration and optimization are key to maintaining effective CTAs that adapt to changing user behaviors and preferences.
Testing and optimizing your CTAs is an ongoing process that requires attention to detail and a willingness to experiment. By leveraging data and user feedback, you can fine-tune your CTAs to drive higher engagement and conversions. Ready to enhance your website’s CTAs? Get a quote at https://guru-is.com/#contact and let us help you achieve absolute web success for your business!